
The Developer Exception Page in ASP.NET Core provides detailed information about exceptions. Because developers need detailed information about exceptions, and end-users don’t, the ASP.NET Core templates enable the Developer Exception Page only when an application is running in the Development environment.
This article talks about the Developer Exception Page Middleware in ASP.NET Core MVC and how we can handle exceptions in both development and production environments in ASP.NET Core MVC applications.
To work with the code examples provided in this article, you should have Visual Studio 2019 installed in your system. If you don’t already have a copy, you can download Visual Studio 2019 here.
Create an ASP.NET Core MVC project in Visual Studio 2019
First off, let’s create an ASP.NET Core project in Visual Studio 2019. Following these steps will create a new ASP.NET Core MVC 5 project in Visual Studio 2019.
- Launch the Visual Studio IDE.
- Click on “Create a new project.”
- In the “Create new project” window, select “ASP.NET Core Web App (Model-View-Controller)” from the list of templates displayed.
- Click Next.
- In the “Configure your new project” window, specify the name and location for the new project.
- Optionally check the “Place solution and project in the same directory” check box, depending on your preferences.
- Click Next.
- In the “Additional Information” window shown next, select .NET 5.0 as the target framework from the drop-down list at the top. Leave the “Authentication Type” as “None” (default).
- Ensure that the checkboxes “Enable Docker,” “Configure for HTTPS,” and “Enable Razor runtime compilation” are unchecked as we won’t be using any of those features here.
- Click Create.
A new ASP.NET Core MVC project will be created. We’ll use this project to work with the Developer Exception Page middleware in the subsequent sections of this article.
Next, follow the steps outlined below to create additional controller(s) in your project:
- Right-click on the Controllers solution folder.
- Select Add -> Controller.
- In the “Add New Scaffolded Item” dialogue, select API as the template (by default MVC would be selected).
- Select the item “API Controller with reading/write actions.”
- Click Add.
- In the “Add New Item” dialogue shown next, specify a name for your new controller.
- Click Add.
Handling exceptions in ASP.NET Core MVC
Consider the following piece of code that throws an exception in the Configure method of the startup class:
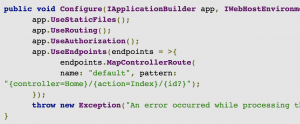
When you run the above application, an exception will be thrown with the error messages shown in Figure 1 below.
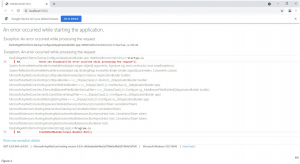
As you can see in Figure 1, the error messages displayed here are neither detailed nor developer-friendly. A better option is to use the Developer Exception Page.
Exception handling in the Development environment
The Developer Exception Page middleware provides developer-friendly error messages when an exception is thrown in the application. This information helps you to trace the errors that occur when the application is running in the Development environment.
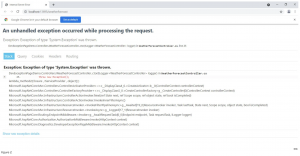
The Developer Exception Page groups this detailed information into five tabbed sections — Stack, Query, Cookies, Headers, and Routing — as shown in Figure 2 below.
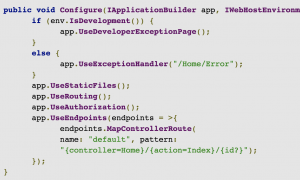
When you create a new ASP.NET Core MVC project in Visual Studio, the ASP.NET Core template generates the following code in the Configure method of the Startup class.
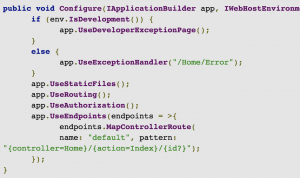
As the preceding code indicates, the Developer Exception Page will be enabled only when the application is running in the Development environment. The Developer Exception Page is not enabled when the application is running in the Production environment. Naturally, the purpose is to avoid displaying exception messages publicly.
Note that the UseDeveloperExceptionPage extension method is called at the beginning of the pipeline before any other middleware is called. This is done to ensure that exceptions in the following middleware will be caught.
Exception handling in the Production environment
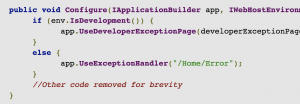
For handling exceptions in the Production environment, you should take advantage of the UseExceptionHandler extension method. The following code listing illustrates how the UseExceptionHandler extension method can be called in the Configure method of the Startup class.
The UseExceptionHandler extension method can be used to configure custom error handling routes. Refer to the following code snippet.
When an error occurs in the ASP.NET Core MVC application, the control will be redirected to /home/error.
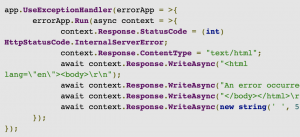
Note you could use a lambda expression in the UseExceptionHandler extension method in lieu of using a custom exception handler page. The following code snippet illustrates how this can be achieved.
The Developer Exception Page is available by adding the Developer Exception Page middleware to the ASP.NET Core MVC request processing pipeline. The default template in ASP.NET Core MVC enables this middleware for the Development environment only. For Production, you can take advantage of the UseExceptionHandler extension method to configure custom error handling.